How to Advertise on Facebook?
21:08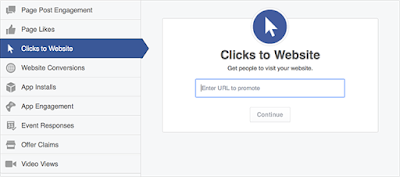
Making advertisements on social media
networks build more traffic and leads to you because social media is an electronic word of mouth. Especially
making advertisements in Facebook makes us to reach your business goals.
More than 1.3 billion
people use Facebook to connect with what matters to them, and 64% visit every
day. Facebook Adverts are shown to people based on their location, age,
interests and more. Most online advertising relies on "cookies" to
decide which adverts to show on different sites. On Facebook, your adverts are
delivered more accurately to the audiences you choose.
Facebook marketing helps your business build lasting relationships with people and
find new customers. You can create targeted adverts for different audiences,
set your budget and measure the results across devices.
Advertising on Facebook helps you to reach your business goals as
- To drive online sales
- Increase local sales
- Promote your business
- Raise your brand awareness
In order
to meet the people who will love your business, you need to follow 4 steps:
- Use free Facebook page to get started
- We will decide what we want to promote
- We need to choose the audiences for your Facebook advertising
- Finally set our budget and then track your results
First
you need to register as a user in Facebook and then login to Facebook. To create an ad campaign, you
need to go www.facebook.com/ads/create . Ad creation takes you through
the process of:
- Choosing your objective: You need to choose your advertising objective as what people want to do when they see your ads. The advertising objectives you can choose from are:

For website conversions
option you will need a conversion
pixel for your website before you
can create this ad. For this you need to follow the steps:
Go to Power editor->
Mange ads and then select conversion tracking->click create pixel then code
will appear->Need to copy the code and then upload that in your webpage.
- Naming your campaign: Create a name for your campaign or use the default name that appears. For example if you select clicks to campaign then your campaign name as:

- Choosing your audience: If you know the specific people you want to reach, then use demographic options (ex: location, age, school), interests and behaviors to create your audience. The snapshot is as shown:

The
main advantage is that at right side of the page it displays the estimated
potential reach based on filled fields.
- Setting your budget, bid and ad schedule: In this you need to fill the corresponding fields:

- Naming your ad set: you need to create a name for your ad set or use the default name that appears. For example:
- Choosing your images: You will upload your images in the Choose different images to create multiple ads section.

The supported image formats are
png (recommended), jpg, gif, ico, bmp. The image
text should not exceed 20%. Our image will be scaled to fit
within a maximum width of 100 pixels and maximum height of 72 pixels.
- Adding texts/links and choosing your ad placements: After choosing your images, you need to fill add text and or links to your ad. A character limit will appear when you edit our text to ensure that your audience will be able to see your entire message.
Headline – 25 characters
Text – 90 characters
Link description – 200 characters

- Placing your order and choosing how you want to pay for your ads:


